2. Understanding Application Pools
One of the slightly
unusual details of website management is that some settings are set on
the website itself (on the virtual directory), while others are applied
through a feature called application pools.
This two-part design allows for more efficient management, because you
don't need to duplicate the application pool settings (which very
rarely need to be changed) for each new web application. Instead, you
can reuse a single application pool for all your websites. And if you
modify the application pool later, all the linked web applications are
affected.
Before you examine how to
create and change application pools, you need to understand that
application pools are quite limited in scope. Most web application
configuration is performed through the virtual directory. The web
application pool sets a small group of low-level settings that apply
only to ASP.NET applications, such as the maximum number of requests to
put on hold before sending a "Service Unavailable" response to new
clients (by default, it's 1000) and the number of times the website
should be allowed to crash catastrophically before being shut down
altogether (by default, 5). Although these settings are interesting,
most shouldn't be touched by anyone but a seasoned network
administrator. In most cases, the default values are the best bet.
However, application pools include two settings that are uniquely important and may require your customization:
To take a look at the
application pools defined on your computer, expand the IIS Manager
tree, and click the Application Pools item that's nested under your
computer name, before the Sites group (Figure 3).
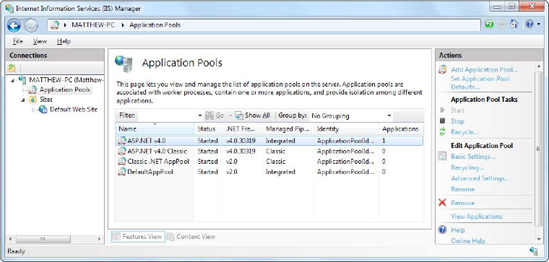
When you first install IIS,
you start with a couple of basic application pools named DefaultAppPool
and Classic .NET AppPool. When you install ASP.NET, the installation
program creates two more IIS application pools—ASP.NET v4.0 and ASP.NET
v4.0 Classic.
NOTE
The "Classic" in an
application pool name indicates that the application uses a slightly
different way of interacting with IIS (which matches IIS 6 and earlier
versions). Generally, the only reason to use classic mode is if you've
created a component that extends the ASP.NET request processing system
in an old version of IIS and you need backward compatibility to make
sure it keeps working in newer versions.
When you look at the
application pool list, you can quickly pick out several details, such
as the version of .NET that the application pool uses, whether it runs
in classic mode or the more modern integrated mode, and how many
applications are currently assigned to that pool. For example, in Figure 3, one application is assigned to the ASP.NET v4.0 pool, while the other pools have no web applications at all.
Here's a quick rundown of the essential tasks you can perform when viewing application pools in IIS Manager:
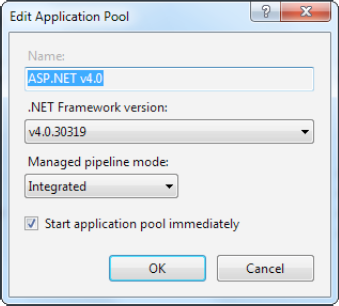
Change basic settings for a pool:
Select the pool,
and click Basic Settings in the Actions pane on the right. The basic
settings let you change just three details (see Figure 4).
These are the version of .NET, whether the pool uses classic or
integrated mode, and whether the pool starts automatically when the
computer boots up (so as to prevent an unnecessary delay when the web
server receives the first request for your website).
Change advanced settings for a pool:
Select the pool, and click
Advanced Settings in the Actions pane on the right. The Advanced
Settings window appears, with a property grid of options. You'll use
the Advanced Settings window to change the application pool account in
the next section.
Create a new pool:
Click Add Application Pool
in the Actions pane. This is the best approach if you want to create a
pool with new, customized settings (such as a different Windows
account). That way, you can keep your application pool separate from
the standard, default pools. This also makes sense if you want some
applications to use your pool and the rest to use one of the standard
pools.
See what applications are in a pool:
Select the pool, and
click View Applications in the Actions pane. This way, you'll know what
websites will be affected if you decide to tweak application pool
settings.